A vinyl decal is more than just an aesthetic addition to your vehicle; it’s an expression of your unique personality and style. Applying a vinyl decal to your car isn’t as complicated as it might seem at first glance. In this post, we’ll guide you through the step-by-step process to help you create a flawless finish.
What is a Vinyl Decal?
A vinyl decal, often referred to as a vinyl sticker, is a design or logo made from a specific type of adhesive material. Vinyl, the main component in these decals, is a type of synthetic resin or plastic that is known for its endurance and versatility. This robust material is durable, waterproof, and resistant to weather, making it the perfect medium for outdoor applications like car decals.
Vinyl decals come in a vast array of colors and designs, and the level of customization is virtually limitless. Whether you’re a business looking to brand your company vehicles or an individual wanting to make a personal statement, vinyl decals are an affordable and effective way to do so. The decals can be cut into almost any shape or size, and printed with any design, offering a great deal of creative freedom.
Beyond aesthetics, vinyl decals serve practical purposes as well. They can help protect your vehicle’s paint job from minor scratches and sun damage. Their durability ensures they will withstand the elements and the rigors of the road for years, maintaining their vibrant colors and sharp details.
The versatility of vinyl as a material has made it popular in many industries, from automotive customization to signage and even in home decor. Whether a small, subtle design or a bold, full-car wrap, vinyl decals allow you to make your vehicle truly your own.
How to Apply a Vinyl Decal?
The application of a vinyl decal can be broken down into the following steps:
Step 1: Preparation. Before starting, ensure your car’s surface is clean and dry. Any dirt, dust, or wax can interfere with the adhesion process. Use a mild detergent and water to clean the area where you’ll apply the decal, then dry thoroughly.
Step 2: Positioning. Place the vinyl decal on your car in the desired position and secure it temporarily with masking tape. It’s important to measure and adjust the placement before you proceed, ensuring the decal is straight and aligned correctly.
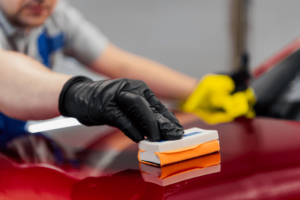
Step 3: Application. Peel off the backing paper from the decal, being careful not to touch the adhesive side. Starting from the top, slowly press the decal onto the car’s surface, smoothing it down with a squeegee or credit card. Ensure there are no air bubbles, as these can ruin the final appearance.
Step 4: Removal. After securely attaching the decal, carefully peel off the transfer tape at an angle. If the decal starts to come off with the tape, stop and press the decal onto the surface more firmly before continuing.
Step 5: Care. Once your decal is applied, avoid washing your car for at least a week to allow the adhesive to set. Later, when washing, avoid using high-pressure water on the decal to prevent damage.
Is Vinyl Decal and Vinyl Sticker the Same?
The terms “vinyl decal” and “vinyl sticker” are often used interchangeably, and in many cases, they refer to the same product. However, there can be a subtle difference. A vinyl sticker typically refers to a graphic printed directly onto adhesive vinyl. On the other hand, a vinyl decal is cut out from a piece of vinyl, leaving no background, and then transferred onto the car’s surface using a transfer tape. The primary difference, then, lies in the application process and the final appearance.
Can You Put Decals on a Vinyl Wrap?
Yes, you can apply decals to a vinyl wrap. Vinyl wraps provide a solid, versatile base for additional decals. This combination allows car enthusiasts to experiment with various customizations without causing permanent changes to the vehicle’s original paintwork.
Before applying the decal to the wrap, ensure that the wrap is clean and dry. Much like applying a decal to the car’s original surface, dust, debris, or moisture can interfere with the adhesive’s ability to bond properly.
Once the surface is prepared, you can proceed with the decal application. However, it’s critical to apply the decal carefully to avoid damaging the wrap. Unlike a car’s hard metal surface, vinyl wraps can be a bit more susceptible to scratches or tears, so treat the surface gently. This also means that when smoothing down the decal, a softer tool, like a felt-edged squeegee, may be preferable to prevent accidental scuffs or damage.
While applying decals to a vinyl wrap can lead to a unique, customizable look, it’s important to note that removing these decals can be more challenging. The adhesives used in decals can sometimes be stronger than the adhesive used on the vinyl wrap, meaning that when removing a decal, there’s a risk you could lift or damage the wrap underneath.
This is why many professionals recommend using removable adhesive vinyl for decals on top of wraps, as it lessens the risk of damage during the removal process. If you’re uncertain or need to remove a decal from a wrap, consider seeking professional help to minimize potential damage.
Do Vinyl Decals Damage Paint?
Many car owners express concern about the potential damage that vinyl decals could cause to their vehicle’s paint. However, it’s important to note that vinyl decals do not typically damage car paint. Quite the opposite – they often serve a protective function when applied correctly.
The vinyl material acts as a barrier between your car’s paint and the elements. It can shield your vehicle from minor scratches, harmful UV rays, and exposure to weather conditions, thus preserving the integrity of your car’s paintwork.
However, there is some potential for damage under specific conditions. If a decal is removed incorrectly, it can pull up some paint or leave behind adhesive residue. This is more likely if the paint was already chipped or damaged before the decal application. To avoid this, always follow the correct procedures for decal removal.
Another potential issue arises when a decal is left on for an extended period. Over time, the sun can cause uneven fading on the car’s paint. If a decal is removed after many years, the paint beneath it might appear noticeably brighter than the surrounding areas. One way to avoid this is by renewing your decals every few years.
When it comes to vinyl decals and car paint, the advantages clearly outweigh the risks. As long as you apply and remove the decals properly and maintain them well, they should not cause any harm to your car’s paint.
What Machine Do I Need to Make Vinyl Decals?
Creating your own vinyl decals is an exciting process that allows you to fully express your creativity. The critical tool you’ll need for this process is a vinyl cutter or a vinyl plotter. These machines are designed to precisely cut your chosen designs out of vinyl sheets, offering a level of precision that is hard to achieve manually.
While a vinyl cutter is a physical tool that does the actual cutting, you also need digital tools to design your decals. This is where design software comes into play. Programs like Adobe Illustrator, CorelDraw, or Silhouette Studio are commonly used for this purpose. These programs allow you to create and modify vector-based designs, which can be easily translated into cuts by the vinyl cutter.
Remember that while the software can help you create incredible designs, it’s your creativity that ultimately makes the difference. So, start brainstorming and let your imagination run wild. Your perfect vinyl decal is just a design session away!
Get Creative with Vinyl Decals in Orlando
If you’re interested in high-quality, professional vinyl decals or need assistance applying or removing them, Orlando Printing Company is here for you. Our experts are always ready to help you make your vehicle an extension of your unique style.